
Fiber Optic Testing With Optical Time Domain Reflectometers – OTDRs
This is your “QuickStart” guide to testing fiber optic cable plants with an OTDR. We’ll give you the basic information you need and provide some printable references. Just go to the topics below to find the information you need. Links to videos and more comprehensive information will be provided in each section.
Before you get started: Is an OTDR appropriate for testing your cable plant?
OTDRs were originally designed to test and troubleshoot long haul networks. New generation OTDRs made for FTTH and LANs can test much shorter networks. If you do not know if your OTDR is designed for shorter networks, check the OTDR manual or contact the applications support department at the OTDR manufacturer to ensure you do not waste time trying to test a network that is too short to test with the OTDR.
Testing A Fiber Optic Cable Plant
This test will acquire a trace of an installed fiber optic cable plant, singlemode or multimode, including the loss of all fiber, splices and connectors. The method shown is on the FOA “1 Page Standard” FOA4 which you may print or download and insert in your documentation.
Equipment Needed To Perform This Test

1. OTDR appropriate for the fiber being tested (Multimode: 850 and/or 1300nm, singlemode, 1310, 1550 and/or 1625 nm)
2. Launch and receive reference cables of the same fiber type and size as the cable plant and with connectors compatible to those on the cable plant.
Notes:
a. If you are only testing for length, you only need a launch reference cable. The receive cable allows you to measure loss of the final connector on the cable. b. Reference cables must be long enough for the OTDR’s initial test pulse to settle down back to the baseline.c. Connectors on the launch and receive cables must be in good condition (low loss) to properly test connectors on the cable under test.3. Mating adapters compatible to connectors
4. Cleaning supplies
Test Procedure
1. Turn on OTDR and allow time to warm-up
2. Clean all connectors and mating adapters.
3. Attach launch cable to OTDR. Attach receive cable (if used) to far end of cable.
4. Set up test parameters on OTDR.
5. Attach cable to test to end of launch cable. Attach receive cable (if used) to far end of cable.
6. Acquire trace.
Note: Most OTDRs have an “auto test” function, but these functions are not foolproof. Most problems with OTDR tests occur when untrained users use the autotest function without having an understanding of how the instrument works, what a good trace looks like and, most inportantly, what are the characteristics of the cable plant they are testing (length, number and locations of splices and connectors). Refer to the next section on reading OTDR traces. Once you are confident that the autotest function is giving valid results, it is a major timesaver in OTDR testing.
Reading OTDR Trace Of A Cable Plant
Here is a schematic of what an idea OTDR trace should look like aligned to the cable plant being tested showing how events will look in the trace. Here is more information on analyzing OTDR traces.
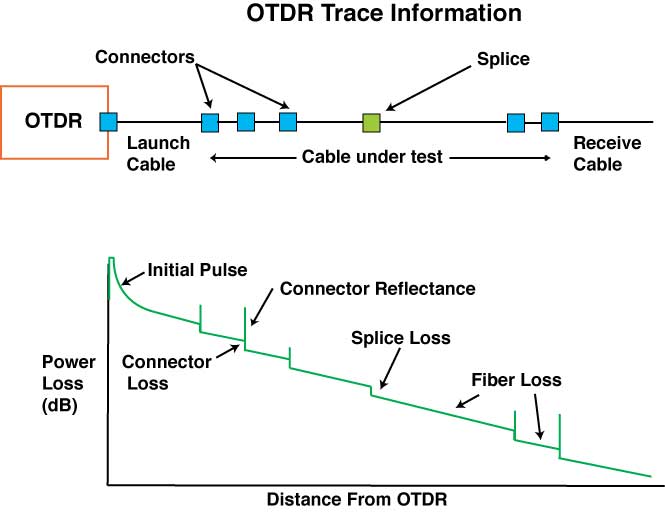
What Test Results Should You Expect?
The results of your test can be estimated by knowing typical component losses (fiber attenuation, splice loss, connector loss) and calculating a loss budget for the cable under test. Use a calculator or the FOA iPhone/iPod/iPad app.
Reducing Measurement Uncertainty
1. Clean all connectors regularly before and while testing.
2. Set OTDR parameters for the highest resolution that will allow covering the length of cable being tested by reducing the test pulse width or duration. Use longer averaging times if necessary to reduce noise.
3. Do not try to analyze traces where the segment being analyzed is nonlinear, usually caused by a high reflectance event or inadequate OTDR resolution.
4. Repair or replace launch and receive reference cables when their connector losses or reflectance become unacceptable.
Documentation
Record the following data to document your tests and keep copies for future reference:
1. Date of the test
2. Cable being tested and fiber identification
3. Operator
4. Test equipment used
5. Test wavelength(s)
6. Store trace Include documentation on location of events and lengths as appropriate.
Measuring Distance With The OTDR
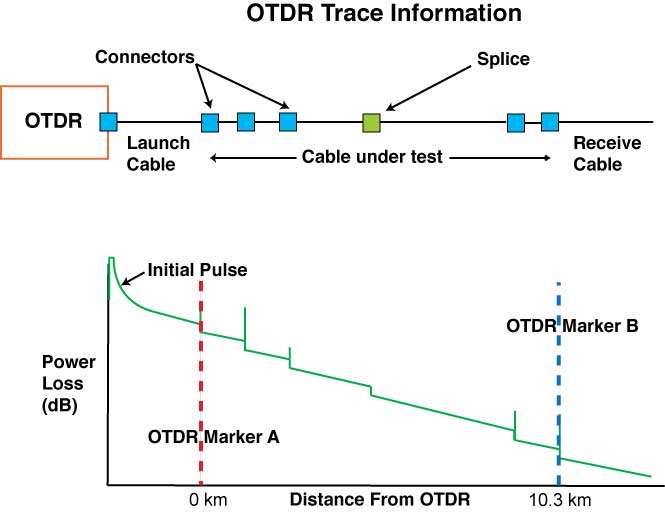
1. Place one of the markers on the OTDR (usually called Marker A) just before the reflectance peak from the connection between the launch cable and the cable under test.
2. Place the second marker (usually called Marker B) just before the reflectance peak from the connection between the cable under test and the receive cable. (If no receive cable is used, there should still be a reflectance peak from the final connector on the cable under test.)
3. The OTDR will calculate the length of the segment between the markers.
Measurement Uncertainty
1. The OTDR measures the length of the fiber, calculated from the index of refraction of the glass in the fiber. If you have the actual value of the index of refraction, enter that in the OTDR setup.
2. The OTDR measures the length of the fiber, not the length of the cable. The fiber is usually 1-2% longer than the cable so you may need to factor that into the length if you are testing a long length of cable.
Measuring Fiber Attenuation Coefficient
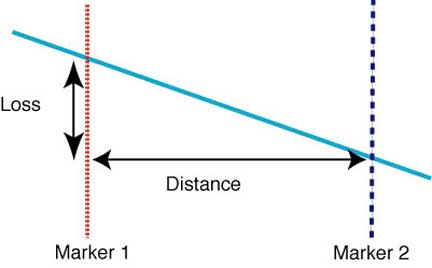
1. Place one of the markers on the OTDR (usually called Marker 1 or A) on the fiber segment to be tested away from any splice or connection in the cable under test.
2. Place the second marker (usually called Marker 2 or B) further away from the OTDR on the same segment.
3. The OTDR will calculate the loss of the segment between the markers and the distance and show the results in dB/km.
Reducing Measurement Uncertainty
1. Ensure the markers are not placed on curved parts of the trace which will cause erroneous readings.
Measuring Splice or Connector Loss
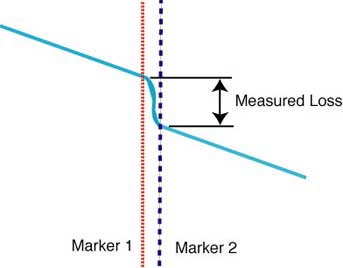
or
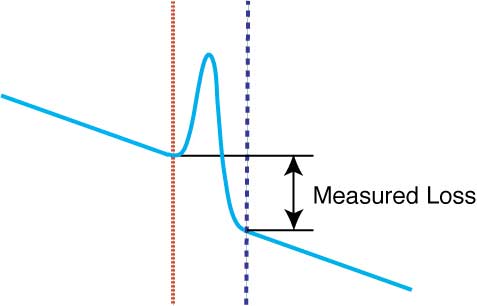
1. Place one of the markers on the OTDR (usually called Marker 1 or A) just before the splice or reflectance peak from the connection in the cable under test.
2. Place the second marker (usually called Marker 2 or B) just after the splice or the reflectance peak from the connection in the cable under test.
3. The OTDR will calculate the loss of the segment between the markers.
Reducing Measurement Uncertainty
1. Ensure the markers are not placed on curved parts of the trace which will cause erroneous readings.
2. The loss of the fiber in the distance between the markers will be added to the measured loss. To avoid this, use the “least squares” method for loss. Check your OTDR manual for instructions .
Measuring Reflectance
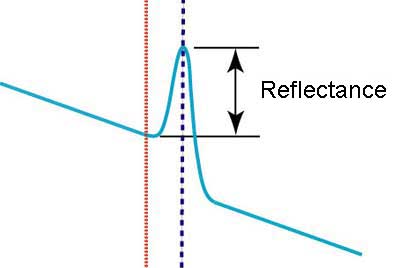
1. Place one of the markers on the OTDR (usually called Marker 1 or A) just before the reflectance peak from the connection in the cable under test.
2. Place the second marker (usually called Marker 2 orB) at the top the reflectance peak from the connection in the cable under test.
3. The OTDR will calculate the reflectance of the peak chosen by the markers.
Reducing Measurement Uncertainty. Ensure the markers are not placed on curved parts of the trace which will cause erroneous readings
Sources : FOA


![download[4]](http://edwardsync.net/wp-content/uploads/2016/03/ezgif-1447380043.gif)